Showing posts with label Equipment. Show all posts

Thursday, March 7, 2013

Plug and Play Thermohygrostat

When I first made my curing chamber finding the necessary temperature and humidity controllers was a bit of a challenge. They were out there but they were expensive and somewhat specialized. (at least for humidity control, temperature has always been easy)
Recently I ran across something which would make the whole thing a little easier. It's a thermohygrostat all in one with two plug and play outputs.

Basically, with this controller, you plug the fridge into one outlet, the humidifier into the other, put the sensor in the fridge, and set it and go. Seems pretty awesome to me!

If anyone has tried one of these, I'd like to hear how it works, but I suspect it's pretty good, as Auber Instruments makes good, inexpensive, controllers.

UPDATE 2/15/14: A friend pointed out that Auber now makes a controller for high humidity environments which has a more robust humidity sensor...i've heard the ones on the standard one go out if they get too wet....it's $20 more but seems to be worth it.


Read More...

Wednesday, February 13, 2013

Curing chamber change


My curing chamber has been working very well for a very long time, but just the other day I decided to make a small change. I've had a bulb in the fridge, on a dimmer, which generates heat to force the fridge to cycle more often, lowering the humidity. This is especially useful in winter when the fridge isn't cycling as often and when a new batch of product is added, which is losing a lot of moisture.
The bulb has worked well, but I've read a lot about how light affects fat and speeds up the oxidation. I'm not sure I've experienced this, but I've read it and heard it from so many sources I figured it must be accurate. To address this I replaced the bulb with a non light emitting ceramic heater used in reptile cages. It plugs right into a bulb socket and can be dimmed just like a bulb. It's perfect!

So far I like it. My chamber was running around 83% RH after I put my latest batch of salame in, which is a touch high. I turned the heater on real low, and it's now around 78-80 which is good; and no light!

Read More...

Wednesday, November 14, 2012

Nice salame tying video

Thanks to blog reader Carl for pointing this video out to me. It's a great demonstration on how to tie larger caliber salami (for example in a beef bung).


Read More...

Thursday, August 23, 2012

Let's talk curing chambers

I've received many many emails asking about specifics of my curing chamber, and more specifically about using different types of refrigerators to use as a curing chamber, so I wanted to post some quick information on choosing a fridge.

Read More...

Thursday, October 7, 2010

Hey, look what I found!!

One of the main problems with the Kitchenaid grinder is the proprietary grinder plates that go with it (standalone grinders use standard plates that come in a billion sizes). There are really only 2 sizes...."fine" and "very fine". The "fine" grinder grinder plate is 1/4", which is pretty good for many salami, the "very fine" is not particularly useful except for a few things. So I had a friend in a machine shop make me a larger 7/16" plate (someone on ebay makes them, take a look there, they're a great deal at $15 a piece). It works really well, but it's a just a HAIR too big. The other day I checked out Ebay to see if anyone had made any other custom plates, and imagine my surprise when I ran into a Kitchenaid "coarse" grinder plate, which didn't look like my "coarse" grinder plate!
It appears that at some point, quite a few years ago, Kitchenaid decided that for home use, a 1/4" coarse plate would be more useful than the one they had back then in the kit, a 3/8" one. I would agree that 1/4" is more useful for stuff like burger...but 3/8" i think would be nice to have for salame. I got it for a bargain $12!

Here is the plate I just got in the mail. I think it'll be a perfect size for many salami...excited to use it.

My advice to all those with a KA grinder is to keep an eye open at thrift stores, flea markets or Ebay for an old style "coarse" Kitchenaid grinder plate.

Read More...

Monday, January 18, 2010

Cheap humidity controllers

I've previously posted about humidity control, and how to control a humidifier inside the fridge. Back then, the only control i could find that was easy to integrate was quite expensive, about $120. Just recently I happened upon (read somewhere, or someone told me, i don't remember) a much cheaper controller. $50! They're available at Grainger.

They have one that is a humidifier controller and a dehumidifier controller. They look pretty nice! The disadvantage of these versus the THC-1 is that each one controls EITHER humidification OR dehumidification. The THC-1 offers a switch.

Read More...

Wednesday, January 13, 2010

New supplier of Italian goods!

Fellow cured meats aficionado Scott, over at Sausage Debauchery, has become so enamored with cured meats that he's decided he wants to help others with their supplies, and while he's at it, with other Italian goods. He's deciding what to carry, so go take a look over at his blog and let him know! I know I want some of that Calabrese hot chili pepper for my future Nduja endeavor!

Good luck Scott!

Read More...

Wednesday, December 9, 2009

My ultrasonic humidifier is broken!

Well, it lasted a good 2-3 years, so i can't complain, but it seems that the humidifier just crapped out. I'd love to hear what everyone here is using for humidification.

Let me know guys (and girls?)!
Thanks

Read More...

Tuesday, January 29, 2008

More humidification ideas

I just received an email from another reader, Drew N., about another method for maintaining humidity in the curing chamber.

It would seem that a 50/50 mix of propylene glycol and distilled water will maintain somewhere around 70% RH. I'm told this would be considerably cheaper than using the beads or sheets I mentioned yesterday, since PG is about $8/pint. I'm not sure where you can buy it, but I can't imagine it being that difficult to source. Again, I have no idea how fast or slow this method changes the RH, but it might be worth a try.
PS: It does seem to be FDA approves, and food safe based on the Wikipedia entry.

Read More...

Monday, January 28, 2008

A few thoughts on humidification

A few people have emailed me asking about humidity control methods for a chamber, and some even gave me some really good ideas, which I thought I'd pass along. Mind you, i've never tried any of these products.


A gentleman, John D., emailed me about a humidifier that can be found on Amazon, which has a built in hygrostat. It is an ultrasonic humidifier, which is what we want. I don't know what the control limits are for the hygrostat (what is the max. humidity which can be set?), or how accurate or inaccurate it is. Accuracy isn't critical, as long as it can keep a relative humidity of 65-75%. This might be something worth looking into, at only $43 shipped.


Another fellow emailed me asking about another humidifier/fridge combo, and I thought about looking into "mechanical" means for maintaining humidity. I've already discussed using a tray of wet salt, but there are other chemical that work too. These methods are used in cigar humidors, so i assume they are food safe. These are just chemical beads, which maintain the environment at a 65% or 70% RH by absorbing, or releasing water into the environment.
There seem to be 2 types. Beads and sheets. I've only looked up one brand, which seems to be well regarded in the cigar world, Heartfelt Industries.

The sheets are available in 60% and 65% RH varieties. I think the sheets would work better for bigger chambers or fridges.


The beads come in 60%, 65% and 70%. I think for a full size fridge you would need a few pounds of them. Not very convenient.


I think both these methods would work well for smaller dorm fridge size curing chambers, or wine coolers being used as wine chambers. I have no idea how often one would have to "recharge" the beads or dry them out, so they may not be very useful.

If anyone tries any one of these, the humidifier, sheets or beads, I'd love to hear about it. If you have any other ideas, or any product which may be useful, don't hesitate to email me, so I can post it, it may help other people too.

Read More...

Friday, September 7, 2007

A purchase-able fermentation box? It should work!

The Thermokool MR-138. Happened to find this while reading something else. People have used this for proofing bread dough, and it seems like it is very accurate and settable to temperatures needed for fermenting salamis. It claims to be able to go from 40-140 deg. F. It goes for about $90 + shipping, so it is more expensive, but all the work is done for you. Might be worth a try.

Humidity control shouldn't be a problem as long as it is well sealed (it should be). You want the humidity high when fermenting (80-90%). If it is too low, spraying some water with a spray bottle or putting a small bowl in the bottom should work. You can find it HERE.

Read More...

Thursday, August 23, 2007

Love Controls temperature switch

Yesterday I posted about using a Love Controls temperature switch to regulate the temperature of my incubation box. A comment was posted that the same control could be used to control the curing chamber, as long as it allowed heating and cooling control.

To be sure, i checked the instruction sheet, and this controller CAN be used for both heating and cooling, so this controller can be used instead of the Johnson Controls one, which is only for cooling. It is actually a little cheaper too at $50 + $10 or so for a thermocouple, but it will require you to do some wiring, and doesn't come in a nice neat box.

Thanks for mentioning this option.

Read More...

Wednesday, August 22, 2007

Key equipment piece #4: The fermentation box

Well, maybe not really a "key equipment piece", but an important one nonetheless for making salame.

When making salame, a bacterial culture is added to the meat to inoculate it with a beneficial flora, rather than relying on random colonization and hoping for the best. This gives the salame flavor as well as protection against harmful bacteria. To assure that the bacteria added rapidly multiples, the salame has to be held at a certain temperature and high humidity before being dried, this is called the "fermentation" or "maturation" stage. The temperature is dependent on the bacteria added, and its optimal growth temperature. Various cultures can be found on butcher-packer's page, and they also have instructions for use there.
So, anyhow, the salame needs to be kept at a certain temperature and high humidity. In order to do this, I bought a large plastic storage container, added some hooks to the lid from which I can hang the salame, a light bulb for heat, and a small computer fan on some perforated pegboard to circulate the warm air.

To the left you can see my plastic box, and the lightbulb. I lined the corner of the box with foil to reflect the heat from the bulb.

Right below that picture you can see the pegboard with the fan in place.

The last important part of this box is something to control the temperature. If the light were to stay on the whole time it would get too hot, ruining our meat. I bought a thermocouple temperature switch which has a built in line voltage controller from Love Controls.

This controller is set for the target temperature, and it turns the bulb on and off. It is about $50 for a controller plus a little more for the thermocouple, but I bet a cheaper one could be found on Ebay.

Having said all that, this isn't really necessary. This can be done by putting the salami in a tupperware, and then in an oven with just the light bulb and leaving the door a little open. You'll need a thermometer and keep track of the temperature for a while at the start, but once you figure out what works for you and your oven, you should be fine.

Pretty much you want to put the salame somewhere where it can stay at a relatively steady temperature of about 70-85 deg. F (exact numbers depend on the bacteria you're using, and desired speed of fermentation), and be in a high humidity environment so it doesn't dry out. I'm sure you can figure out a simpler way to do it than what I did...I just set it up like this to be able to specify an exact temperature and have it be repeatable every time. The temperature of your fermentation and how long you leave it will have a profound effect on the final flavor.

The amount of time you ferment is dependent on your temperature, you must get the pH of the meat paste below 5.1 within 36-48 hours. Most of the time I ferment for 24 hours. I urge you to read "Charcuterie" or "Cooking by Hand", as they can explain the process and timing much more clearly than I can, and I don't want to be held responsible for improperly cured salame getting someone sick. Look in my books list for these two books, they're books you should own anyhow, if you're into curing or sausages.

Read More...

Sunday, July 29, 2007

Key equipment piece #3: The curing chamber

Here we are. This is probably the post most beginners are waiting for. This is the hardest part of curing meat. The necessity to maintain a cool temperature around 50-55 deg. F/ 10-13 deg. C, and a high relative humidity, around 65%, make curing meat at home difficult. Incorrect temperatures or humidity will cause the meat to cure too slowly or too quickly and possibly spoil or yield poor results.

Let me start by saying, making a curing chamber isn't TOO difficult. It will require some spare equipment and some small modifications to the equipment, as well as some money. A complete curing chamber can be built for about $250 of parts. Let me also say, that I assume NO responsibility for anything that may happen, injuries or otherwise.

Basically making a curing chamber boils down to modifying a home refrigerator. Let me start with some refrigeration theory which will allow you to understand why we need to do what we do.

When a frost free refrigerator (pretty much all modern day fridges) cools the air by running air over the cooling coils, it condenses humidity from the air, and delivers cold, very dry air to the inside of the fridge. The air is way too dry (around 20% RH) to be any good for curing meats, so we want to put moisture, the right amount, back into it. Additionally, a fridge normally run at about 33-43 deg. F, which is too low for our uses. This means we'll have to find a way to allow the fridge to run warmer.

A good place to look for a fridge is classifieds. Without too many problems I was able to find a frost free fridge for $80. I might have been able to find one even cheaper if I had kept looking. I guess you could go buy a new fridge, but that seems to be a waste to me. Remember if you buy an old used fridge, it HAS to be the frost free type.

Now lets make the fridge run like we need it to, at 50-55 F and 65% RH.
Lets start with the easier problem: the temperature. Some fridges have an adjustable set screw which would be covered by a panel which will allow you to adjust the fridge to keep the temperature higher than the normal 43. Mine didn't have that option, so I had to rely on other measures. An external temperature controller used to control many things, and often sold as a control for freezers to make them into beer keg fridges, is easily findable. These can be found online. I found mine on Ebay.
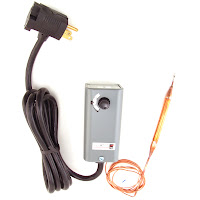
The device is quite simple. A remote temperature probe, seen on in the picture on the left connected by a brass capillary tube to the body of the temperature controller hanging on the outsize of the fridge. The temperature is adjustable between 20 and 80 deg. F. The fridge plugs into the piggyback style plug on the controller. The controller cuts power to the fridge when it reaches the temperature setting, and allows power to the fridge once the temperature is at (set point + 4 deg.). It works very well, maintaining the temperature between 52 and 56 deg.
You can order one of these from many places on the web, there is even a reseller on Amazon. Just search for "keg temperature controller" on Google.

The next task is a little bit more difficult. Maintaining humidity. This is done using an ultrasonic room humidifier. I specify ultrasonic since the cool air ones use sponges which in short order become moldy and need to be replaced, which gets expensive. A warm mist one, well, that is just counter productive (I've tried it, believe me, it is a foolish idea:) ) as you're trying to keep the fridge cool.

Any ultrasonic humidifier will work, but you probably want one with a nice large tank so that you don't have to refill it very often. The one on the left is the one I use, it is a Sunbeam model 701, and holds about 2 gallons of water, which allows me to run it, in my fridge, at my settings, for about 15 days before having to refill it.


So you've procured yourself an ultrasonic humidifier, but how do you make it stop humidifying at the right level, instead of continuously going until the water runs out? With a hygrostat. It is a device which, just like the temperature controller above, supplies or cuts power to the attached humidifier as necessary to maintain the correct humidity level. This piece of equipment, unfortunately is quite expensive. I got mine on Ebay for $75, but they retail for about $115.


You can see in the picture on the left, the humidity setting is adjustable between 10% and 90%, and you can hook up a humidifier or a dehumidifier. This one is called the THC-1 and is made by Green Air products, and is easily found by searching for THC-1 on some search engines.


This one is another model I ran across, which can be found here: http://www.control3.com/4190p.htm .
This one was really hard to find, so much so that I can't find it again searching for it, so I'm giving you the direct link. Who knows how long it'll be a good link though.


I have seen, and bought on Ebay, an ultrasonic humidifier with a settable humidity controller on it, but they seem to be rare, I'm not sure why. The cool mist types have them, but for some reason, the ultrasonic ones don't seem to. If you end up spending as much for one as you would as buying the controller separately, I would buy them separately, so that if the humidifier breaks you can just replace that cheaply, instead of having to buy another expensive one.

So now you've got a fridge, a temperature controller an ultrasonic humidifier and a hygrostat. Now what? Well, now you set it all up INSIDE your fridge! You put the humidifier inside the fridge, the controller probe inside the fridge, and the hygrostat inside the fridge. Set your temperature to about 53 deg F, the hygrostat to about 65 and let 'er rip.

You're going to be running plugs into the fridge from extension cords which could be unsafe, so if you follow my instructions, don't email me if you electrocute yourself. This is what my fridge looks like. You can see a nice pancetta hanging in there too.

You can see my humidifier, and the humidity controller, and the temperature probe. You can also see that I made some additional modifications by drilling a hole in the side of the fridge and wiring a plug on the inside wall, instead of having an extension cord going in from the fridge hinge. You can also see a light bulb at the top of the fridge.
This bulb isn't totally necessary, but it allows you to control the humidity level in a tighter band. Without the bulb the fridge runs between 50% RH and 70% RH, but it is at the upper and lower limits for a short time. After the fridge runs to cool the air (goes to about 50% RH) the humidity drops as the air is dried (explained above), and the humidifier takes 10-15 minutes to catch up and rehumidify the air. It is at the top of the humidity level since the controller has a dead band (the point between setting and turning off or on), of about 5%, so it overshoots the humidity by a little bit. By putting a light bulb in the fridge we can introduce a small amount of heat, which will force the fridge to come on more often, drying the air more often. If you do want to do this, use a 25w bulb and run it to an adjustable dimmer do you can adjust the amount of heat you're putting into the fridge.

I'm actually not 100% sure about the necessity of the bulb, so installing one is up to you. It does seem to maintain the humidity in tighter band, but I'm not sure that it is that important.


This is a picture of my connections on the outside of the fridge. I ran 1 main power line to a supply box and put the light dimmer in there. The controller and fridge plug into the box.


Oh, one more piece of necessary equipment is a thermo hygrometer. These are small electronic devices which measure and display the humidity and temperature. You can find them on Ebay for about $8. Just put it in the fridge, and you can measure the humidity and temperature to make sure you're running at the right values. I got one with a remote probe made by Oregon Scientific so I don't have to open the fridge to see what is going on inside. The reader is inside, and the display is outside and receives the signal via radio frequency.

Before concluding, let me mention another method to control humidity. I've tried this method, and wasn't pleased with the performance. In theory a saturated salt solution with excess salt added (water in which as much salt is dissolved to saturate it, that is, so that no more salt will dissolve in it, and then adding more salt, essentially creating a tray of wet salt in a saturated salt solution), will maintain a humidity of about 70%. If the solution is placed in an area which is lower, the water will evaporate until the ambient is 70%, and if it is higher, it will absorb the humidity to lower it to about 70%. The problem I found with this method is that it all happens so slowly (the humidity changes), that it becomes useless. If you want to try this, use an oven tray and make a saturated solution in it, and place it in the fridge.

Wow, quite the blog entry. I hope the why and the how is explained clearly. If you want to cure meats at home, unfortunately for just about everything except pancetta, you'll need one of these. If you have any questions, ask, and I'll answer them if I can. While this is a bit of an investment I hope the components will last a good long while. I've had mine for about 2.5 years now and it still works well.

As far as future modifications I have in mind for the fridge, well, some sort of fresh air inlet. Normally I open the fridge and let it "air out" every few days. I'm trying to think of a way to get fresh air into it, either on a timer, or when something else turns on. Given that the fridge is in my garage, the air isn't so fresh unless I have the garage door open too, so for now I'll leave the system closed and manually refresh the air.

Read More...

Saturday, July 28, 2007

Key equipment piece #2: The stuffer

The stuffer, well, stuffs! It is used to force ground meat, or meat paste into casings. Again, this is a piece of equipment which is only necessary to make cured meats which involve ground meat. I guess I'm saving the most difficult piece of equipment to make, the curing chamber for last!


This is the cheapest stuffer, an attachment for the grinder for the Kitchenaid mixer, and I bought it thinking, hey one less piece of equipment to buy, I have the grinder already. Wow was i ever wrong. Basically for $15 you get three stuffer tubes for different size casings, and a few pieces. You put the tubes on instead of the cutter and grinder
plates and, in theory, the meat paste is loaded into the top (like the meat cubes were) and is forced into the tube and then the casings by the auger. Unfortunately, all you end up with is a complete mash of the fat and meat that, with some luck, MAY end up in the casings, if you don't pull your hair out first, and if your wife hasn't killed you for the mess you've made from going crazy trying to do this.
This stuffer is TERRIBLE. Do not waste your $15, it serves no purpose other than making an undifferentiated meat paste which has no recognizable components, AND it is impossibly difficult to even get it to do that well.

This next stuffer was the next one I tried. It is a push stuffer. I bought mine on Ebay, a stainless steel 3 pound model. I don't remember how much it cost me exactly, but it was about $40 after shipping. The theory behind it is sound. You load the meat into the chamber, and you manually push the handle down, which forces the meat paste from the chamber into the stuffing tube and into the casing. Unfortunately, the theory is sounder than the practice. Since the piston is also made of steel, and has no gasket around it, there is a considerable amount of meat which, when you're plunging the piston, is forced out around the piston, instead of out of the tube. The sizing between the piston and the body just wasn't tight enough. For a while I remedied this by making my own rubber gasket which I would put over the meat before plunging, and that worked OK, but using this thing was just not very easy, it slipped around when plunging, and just generally wasn't fun to use. I'd say, if you're looking for the cheapest option (other than spooning the mixture into the casings), this is the one, but it just isn't great.


Finally, once I'd had enough of using the push stuffer, and I got a crank stuffer. What a difference. Now stuffing wasn't something I dreaded anymore. The ground meat retained the proper texture, the meat and fat didn't smear, and it was really easy to use and clean. Wish I had saved the money and aggravation and gotten one of these right off the bat. The best deal can be had from Northern Tool, for $80 plus shipping for one of these, and it is money very well spent if you plan on making sausages or salame.
The meat is loaded into the steel chamber, and a plastic piston with a nice rubber gasket around it is forced into the chamber by the use of a crank. Yay, mechanical advantage! You gently crank, the piston lowers and forces the meat out the piston. It is as simple as it gets. It comes completely apart for cleaning, and running through the dishwasher, making the cleanup simple.

Here are some of the components. You can see the meat chamber which holds about 4-5lbs of meat, the piston and its o-ring, the air valve to allow the air out of the chamber as you press the meat, and one of the three stuffer tubes that comes with it.

Save yourself time, money and a lot of cursing, and buy this one if you need a stuffer.


Next post: the curing chamber. I'll try to get to it tomorrow


Read More...

Thursday, July 26, 2007

Key equipment piece #1: The grinder

I hope I'm not detailing information which is useless to most, but i figure if there are any beginners, they might benefit from this. There are a few pieces of equipment which are necessary to make cured meats. The only truly essential piece of equipment is probably the hardest for the home user to find or make; the curing chamber. That will be the topic of another post. This one will deal with the grinder, a necessity to make salame or dry cured sausages.

On the left here you can see an annotated image of the Kitchenaid grinder attachment. I use this attachment as it works quite well, is inexpensive and for the amount of meat I grind in 1 sitting (5 to 10 lbs/ 2-4kg) it is enough. This grinder plugs into the drive output on the Kitchenaid mixer. Everything you see in this picture, except the 7/16" plate comes with the grinder. That plate was made by a machinist friend of mine to allow a larger grind size. (this is one big disadvantage of the Kitchenaid grinder, the plates are proprietary to the KA, and therefore standard plates don't work)

The auger fits into the grinder body, the cutter blade is put on the end of the auger and the grinder plate is placed in front of that, and held in place by the ring which in the picture is attached to the grinder body. Meat is fed in from the top of the body where the tray is and is forced through the cutter and plate, yielding ground meat.

In using this grinder, it is important to remember that the meat and fat mixture needs to be very very cold, chilled in the freezer to the point where it is a little hard. The colder the meat is kept, the cleaner the cut. This means that the meat and fat chunks will remain distinct, which is important, fat smearing is the enemy of salame.

It is also important to trim the meat well, removing sinew, or this will wrap itself around the cutter blade and cause the meat to mush through the plate instead of being cleanly cut. I believe with bigger more powerful grinders, this is not as critical as they're able to cut through the sinew, but with the KA grinder it is important.

When making sausages and salame I've found it works best to mix the meat and the fat chunks to be ground, and grind them together, rather than separately and then mix them. This isn't optimal, obviously, for salame which requires different size meat and fat particles.

The grinder is pretty simple. Most grinders will work for making salame. If you don't have a Kitchenaid mixer, and are still interested in making salame, you can buy a standalone grinder for about $75, or a hand grinder for about $35.

Let's also remember that a grinder isn't a necessity to make cured meats. Many are cured whole muscles, and as such, do not require grinding.

Next up, key equipment #2: the stuffer, and key equipment #3: the curing chamber.

Stay tuned!


Read More...