Let me start by saying, making a curing chamber isn't TOO difficult. It will require some spare equipment and some small modifications to the equipment, as well as some money. A complete curing chamber can be built for about $250 of parts. Let me also say, that I assume NO responsibility for anything that may happen, injuries or otherwise.
Basically making a curing chamber boils down to modifying a home refrigerator. Let me start with some refrigeration theory which will allow you to understand why we need to do what we do.
When a frost free refrigerator (pretty much all modern day fridges) cools the air by running air over the cooling coils, it condenses humidity from the air, and delivers cold, very dry air to the inside of the fridge. The air is way too dry (around 20% RH) to be any good for curing meats, so we want to put moisture, the right amount, back into it. Additionally, a fridge normally run at about 33-43 deg. F, which is too low for our uses. This means we'll have to find a way to allow the fridge to run warmer.
A good place to look for a fridge is classifieds. Without too many problems I was able to find a frost free fridge for $80. I might have been able to find one even cheaper if I had kept looking. I guess you could go buy a new fridge, but that seems to be a waste to me. Remember if you buy an old used fridge, it HAS to be the frost free type.
Now lets make the fridge run like we need it to, at 50-55 F and 65% RH.
Lets start with the easier problem: the temperature. Some fridges have an adjustable set screw which would be covered by a panel which will allow you to adjust the fridge to keep the temperature higher than the normal 43. Mine didn't have that option, so I had to rely on other measures. An external temperature controller used to control many things, and often sold as a control for freezers to make them into beer keg fridges, is easily findable. These can be found online. I found mine on Ebay.
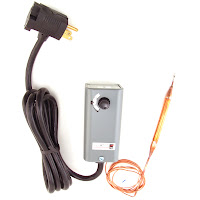 The device is quite simple. A remote temperature probe, seen on in the picture on the left connected by a brass capillary tube to the body of the temperature controller hanging on the outsize of the fridge. The temperature is adjustable between 20 and 80 deg. F. The fridge plugs into the piggyback style plug on the controller. The controller cuts power to the fridge when it reaches the temperature setting, and allows power to the fridge once the temperature is at (set point + 4 deg.). It works very well, maintaining the temperature between 52 and 56 deg.
You can order one of these from many places on the web, there is even a reseller on Amazon. Just search for "keg temperature controller" on Google.
The next task is a little bit more difficult. Maintaining humidity. This is done using an ultrasonic room humidifier. I specify ultrasonic since the cool air ones use sponges which in short order become moldy and need to be replaced, which gets expensive. A warm mist one, well, that is just counter productive (I've tried it, believe me, it is a foolish idea:) ) as you're trying to keep the fridge cool.
 Any ultrasonic humidifier will work, but you probably want one with a nice large tank so that you don't have to refill it very often. The one on the left is the one I use, it is a Sunbeam model 701, and holds about 2 gallons of water, which allows me to run it, in my fridge, at my settings, for about 15 days before having to refill it.
So you've procured yourself an ultrasonic humidifier, but how do you make it stop humidifying at the right level, instead of continuously going until the water runs out? With a hygrostat. It is a device which, just like the temperature controller above, supplies or cuts power to the attached humidifier as necessary to maintain the correct humidity level. This piece of equipment, unfortunately is quite expensive. I got mine on Ebay for $75, but they retail for about $115.
 You can see in the picture on the left, the humidity setting is adjustable between 10% and 90%, and you can hook up a humidifier or a dehumidifier. This one is called the THC-1 and is made by Green Air products, and is easily found by searching for THC-1 on some search engines.
 This one is another model I ran across, which can be found here: http://www.control3.com/4190p.htm .
 This one was really hard to find, so much so that I can't find it again searching for it, so I'm giving you the direct link. Who knows how long it'll be a good link though.
I have seen, and bought on Ebay, an ultrasonic humidifier with a settable humidity controller on it, but they seem to be rare, I'm not sure why. The cool mist types have them, but for some reason, the ultrasonic ones don't seem to. If you end up spending as much for one as you would as buying the controller separately, I would buy them separately, so that if the humidifier breaks you can just replace that cheaply, instead of having to buy another expensive one.
So now you've got a fridge, a temperature controller an ultrasonic humidifier and a hygrostat. Now what? Well, now you set it all up INSIDE your fridge! You put the humidifier inside the fridge, the controller probe inside the fridge, and the hygrostat inside the fridge. Set your temperature to about 53 deg F, the hygrostat to about 65 and let 'er rip.
You're going to be running plugs into the fridge from extension cords which could be unsafe, so if you follow my instructions, don't email me if you electrocute yourself. This is what my fridge looks like. You can see a nice pancetta hanging in there too.
 You can see my humidifier, and the humidity controller, and the temperature probe. You can also see that I made some additional modifications by drilling a hole in the side of the fridge and wiring a plug on the inside wall, instead of having an extension cord going in from the fridge hinge. You can also see a light bulb at the top of the fridge.
This bulb isn't totally necessary, but it allows you to control the humidity level in a tighter band. Without the bulb the fridge runs between 50% RH and 70% RH, but it is at the upper and lower limits for a short time. After the fridge runs to cool the air (goes to about 50% RH) the humidity drops as the air is dried (explained above), and the humidifier takes 10-15 minutes to catch up and rehumidify the air. It is at the top of the humidity level since the controller has a dead band (the point between setting and turning off or on), of about 5%, so it overshoots the humidity by a little bit. By putting a light bulb in the fridge we can introduce a small amount of heat, which will force the fridge to come on more often, drying the air more often. If you do want to do this, use a 25w bulb and run it to an adjustable dimmer do you can adjust the amount of heat you're putting into the fridge.
I'm actually not 100% sure about the necessity of the bulb, so installing one is up to you. It does seem to maintain the humidity in tighter band, but I'm not sure that it is that important.

This is a picture of my connections on the outside of the fridge. I ran 1 main power line to a supply box and put the light dimmer in there. The controller and fridge plug into the box.
Oh, one more piece of necessary equipment is a thermo hygrometer. These are small electronic devices which measure and display the humidity and temperature. You can find them on Ebay for about $8. Just put it in the fridge, and you can measure the humidity and temperature to make sure you're running at the right values. I got one with a remote probe made by Oregon Scientific so I don't have to open the fridge to see what is going on inside. The reader is inside, and the display is outside and receives the signal via radio frequency.
Before concluding, let me mention another method to control humidity. I've tried this method, and wasn't pleased with the performance. In theory a saturated salt solution with excess salt added (water in which as much salt is dissolved to saturate it, that is, so that no more salt will dissolve in it, and then adding more salt, essentially creating a tray of wet salt in a saturated salt solution), will maintain a humidity of about 70%. If the solution is placed in an area which is lower, the water will evaporate until the ambient is 70%, and if it is higher, it will absorb the humidity to lower it to about 70%. The problem I found with this method is that it all happens so slowly (the humidity changes), that it becomes useless. If you want to try this, use an oven tray and make a saturated solution in it, and place it in the fridge.
Wow, quite the blog entry. I hope the why and the how is explained clearly. If you want to cure meats at home, unfortunately for just about everything except pancetta, you'll need one of these. If you have any questions, ask, and I'll answer them if I can. While this is a bit of an investment I hope the components will last a good long while. I've had mine for about 2.5 years now and it still works well.
As far as future modifications I have in mind for the fridge, well, some sort of fresh air inlet. Normally I open the fridge and let it "air out" every few days. I'm trying to think of a way to get fresh air into it, either on a timer, or when something else turns on. Given that the fridge is in my garage, the air isn't so fresh unless I have the garage door open too, so for now I'll leave the system closed and manually refresh the air.


